#navbar-iframe { height:0px; visibility:hidden; display:none; }
Showing posts with label desserts. Show all posts

Sunday, June 30, 2013

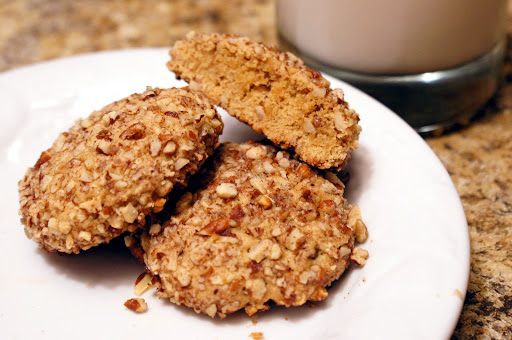
Instead of Winning Powerball Numbers, I Dream Up an Almond Butter-Chocolate Chunk Cookie Recipe.


I'm on summer vacation.  I know people think that teachers have it soooooo easy in June, July, and August, but that isn't always the case.  Many of us (myself included) are taking classes, teaching summer school and attempting to entertain our own kiddos 24/7.  Even so, I am lucky enough that I am getting a break from getting up at 5 am and heading out to work in complete darkness.

One of my problems, though, is I have a very difficult time sleeping in.  I want to.  I really really want to.  I just can't do it.  So I have gotten into the habit of doing little solitary projects in the early hours of the morning while my menfolk are still sleeping. 

This morning as I woke up I realized I had been dreaming about a cookie recipe.  Such is my life, I guess.  Anyhow, I've been reading a lot about gluten-free baking and also the whole paleo diet movement.  I think it's interesting how similar the gluten-free and paleo diets are to vegetarian diets (with the obvious exception of meat).  I thought I would try to create a cookie that was gluten-free, sugar-free, dairy-free and both vegan AND paleo-friendly.  I went to bed last night thinking about it, and woke up with the recipe in my head.

I love how these turned out.  Out of the oven they were crispy on the outside and chewy on the inside.  The chocolate was all warm and melty and I convinced myself that they had no calories.  I have to say, however, that much like an 8th grade girl's promise to keep something a secret, these cookies don't last long.  They are best for the first hour after baking.  After that, they become quite cakey and lose their outer "cookie crunch."  I decided to freeze the leftover cookies, though, and plan to mix them into some almond milk ice cream once I work off the half dozen I ate this morning.


1 ripe banana
1/2 cup crunchy almond butter
1 tablespoon flax meal mixed with 3 tablespoons water (mix and allow to sit until goopy)
2 tablespoons maple syrup
1 teaspoon vanilla
2 cups almond meal
1/4 teaspoon baking soda
1/4 teaspoon sea salt
2/3 cup almonds, coarsley chopped
1/2 cup dark chocolate, coarsley chopped
 
 
1.  Cream banana with a mixer until there are no chunks.  Add all the wet ingredients and mix well.
2.  Fold almond meal into liquid.  Fold in chocolate and almond chunks.
3.  Put mixture into the refrigerator for an hour so it firms up a bit.
4.  Preheat oven to 350°.  Use a non-stick cookie sheet or make sure you grease yours or use parchment paper (I used a non-stick sheet AND greased it as well).
5.  Portion dough out using a small scoop.  Pat them out on the tray as big as you'd like; they won't really spread and if you leave them too thick they won't cook well in the middle.
6.  Bake for 12 to 14 minutes, or until they crisp up and the edges begin to darken.  I suggest doing a test cookie first to find your baking time (these ingredients are pretty pricey so you don't want to screw up a batch by under or over cooking).  The bottom of the cookie browns up pretty quickly, so keep an eye on the clock.
7.  Cool slightly on the sheet then move to a wire rack.  Serve while they're still warm.  Makes about 18 cookies.


Pin It!

Tuesday, April 9, 2013

Baked Banana-rama x 3


Well, Folks, it's official:  I am spending too much time dreaming up ways to use the banana surplus at our house.  My four-year-old, who if given the choice would've lived on bananas and Pop-Tarts alone, has recently announced that he is "mostly done" with the fruit.  This leaves me over-thinking the purchase each week.  If I buy too few he is sure to decide his decision about giving them up was too hasty.  If I buy too many, well . . . you get the idea.  Another blog post.

For this recipe, I had about a half dozen over-ripe bananas and too much time on my hands.  I baked the batch, added some candied walnuts (which were so good I almost didn't have enough to use in the pictures because I would not stop eating them) and then did the final preparation three ways:  straight-up baked bananas, banana pudding, and banana ice cream.  


Candied Walnuts

1 cup whole walnuts
1/2 cup agave syrup or maple syrup (or honey for non-vegans)
1 teaspoon allspice
1/2 teaspoon fine sea salt
1/4 teaspoon cayenne pepper


1.  Heat all ingredients (except walnuts) over medium; stir once until mixed then cook until sugar is dissolved, about 3 minutes.
2.  Add walnuts and bring to a simmer.  Give the mixture a good stir to coat then cook for about 5 minutes while the sugar browns up a bit.
3. Drain walnuts in a mesh sieve over a bowl to catch the hot sugar mixture.  Spread the walnuts over wax paper on top of a wire rack.  They will get all crunchy and yummy as they cool.
4.  Spread the reserved hot sugar on a cookie sheet covered in wax paper.  When the sugar mixture starts to harden and cools enough to touch (about 2 minutes), peel from the wax paper and set aside to harden on the cookie sheet as you prepare the bananas.  Makes 1 cup walnuts and about a 1/4 cup of the candy chunks.


5.  Once the sugar has hardened on the cookie sheet, bust it up with a mallet into candy chunks and set aside.


Baked Bananas


Half a dozen or so over-ripe bananas
1/2 cup coconut milk
1/4 cup brown sugar

Steps:

1. Slice the bananas lengthwise and place into a baking dish


2.  Pour milk over bananas and sprinkle all with brown sugar.
3.  Bake uncovered at 350° for 30 minutes.


4.  Now, decide how you want to serve them!


Baked Bananas

1. Carefully plate the bananas and sprinkle with walnuts, candy chunks and a dash of cinnamon for color. Serve warm or cold.


Baked Banana "Pudding"


1.  After baking bananas, purée them in a food processor until the consistency of pudding.  Add some of the baking liquid (the milk and sugar) as needed to get it to desired creaminess.
2.  Sprinkle with walnuts, candy chunks and  cinnamon. Serve warm or cold.


Banana Ice Cream with Candied Walnuts

1.  After baking bananas, purée all but 2 of them to a smooth consistency.  Add some of the baking liquid (the milk and sugar) as needed until mixture is nice and smooth.
2.  Gently add reserved bananas, cut into chunks.  Add 1/4 cup of the walnuts and stir carefully until mixed.


3.  Add mixture to a small container for freezing.  Smooth it down to make sure it freezes uniformly.
4.  Coarsely chop another 1/4 cup of walnuts and cover the top of the mixture as pictured.  Add the sugar chunks as well.  This will be the bottom of the ice cream.


5. Cover and freeze upside down overnight.
6.  Top with remaining walnuts to serve.


Pin It!

Sunday, March 10, 2013

I Finally Trust You Enough to Share my Recipe for Black Magic Cake!


I have trust issues, Folks.  My issues are varied, come in all shapes and sizes, and will take lots of therapy to overcome.  My life has changed a lot since I've started this blog.  I've divorced, moved back to my hometown with my kids, fallen for a new fella and moved the big lug in.  I've really been trying to work on fresh starts and a positive attitude and not being so guarded and . . . skeptical of everyone.

So what in the hell does this have to do with chocolate cake, you ask?  Great question!  This recipe means a lot to me.  I can't remember a family celebration when this cake wasn't in the middle of our big table.  My father would make this for every birthday and knew the recipe by heart.  Then, years ago, I made a family cookbook and it was the first time I had seen an actual recipe.  For every celebration after that, I would make Dad's Black Magic Cake, and it was awesome.

Then I started this blog, and figured one day I would tinker with his original recipe and not only veganize it, but make it, well, awesome-er.  In the past few years every time I attempted to transform the recipe I would doubt myself and never changed it.  I didn't trust my skills and didn't trust that I would be able to make a vegan version that was even close to what I grew up with.  And then something magical happened: my son asked for the cake for his 10th birthday, and added that I should post the recipe on Vegerrific.

The beautiful thing is I just "went with it," trusted that I had good instincts and- damn it all- I do believe that this is the best cake I have ever made, eaten, and allowed my children to devour until they were in chocolate comas.  It was, without a doubt, awesome-er!


Dry Ingredients:

1 3/4 cups flour
2 cups Florida Crystals sugar
3/4 cup unsweetened cocoa powder
2 teaspoons baking soda
1 teaspoon salt
1 teaspoon baking powder

Wet Ingredients:

6 ounces (3/4 cup) coconut yogurt (vanilla flavor)
1/4 cup coconut milk
1/2 cup vegetable oil
3 teaspoons Egg Replacer, mixed with 4 tablespoons water
1 teaspoon vanilla extract
1 teaspoon chocolate extract (or just double the vanilla extract)
2 tablespoons instant espresso prepared with 1 cup water, cooled to room temperature
Desired frosting (recipe follows for my Black Magic frosting)


1. Preheat oven to 350º. Mix all the dry ingredients in bowl and set aside.
2. Mix all wet ingredients, beating with hand mixer for two minutes exactly.
3. Combine both mixtures, stirring gently. When all ingredients are wet, beat with hand mixer for 2 minutes. The batter may be thick.
4. Pour into a greased and floured 9” x 13” x 2” pan or two round cake pans. For the record, we always made this cake in a rectangular baking dish and didn't mess with trying to make a pretty round cake.  We are cake eaters in this family, not cake decorators.
5.  Bake 35 to 40 minutes. Check for doneness at 35 minutes.
6. Spread with Black Magic Frosting when cooled (recipe follows).


"Look, Ma . . . no salmonella!' (Get it? 'Cause there aren't any eggs in the cake batter!)


Black Magic Frosting

2 tablespoons softened Earth Balance (more to taste for creamier frosting)
1 tablespoon instant espresso prepared with 1/2 cup water, cooled to room temperature
4 tablespoons coconut milk 
6 tablespoons unsweetened cocoa powder
32 ounces of Florida Crystals powdered sugar
2 pinches ground cinnamon
1 bag of vegan chocolate chips (if desired)

1. Combine Earth Balance, coffee, cocoa and cinnamon. Add creamer, blending well.
2. Add sugar cup by cup, beating to desired consistency.
3. Add more Earth Balance to make the frosting creamier if desired.
4. Frost cake and the cover top with chocolate chips, of using.

Pin It!

Friday, December 28, 2012

I Made You No-Bake Cookies because I'm Super Cool like That . . .


Full disclosure:  I. Do. Not. Like. No-Bake. Cookies.  I don't know why that is, but I never have, never will.  I DO like my man, however, so when he asked for these during my Christmas-cookie-baking-frenzy I was happy to make them for him.  This is my grandmother's recipe with a few additions of my own. 


1 stick butter (use Earth Balance to veganize recipe)
2 cups sugar
4 tablespoons cocoa
½ cup milk (non-dairy milk to veganize.  I wonder how this would taste using dark chocolate almond milk . . . next time I'm trying it!)
1 cup smooth peanut butter (use chocolate-peanut butter if you can find it!)
1 tablespoon vanilla extract
1 teaspoon chocolate extract
3 cups oatmeal
Waxed paper
Powdered sugar and extra cocoa for dusting (if desired)


1.  Melt butter over medium-low heat in a heavy saucepan.   
2.  Add  sugar, cocoa, and milk, raise temperature to medium, and stir occasionally until the mixture reaches a slow boil.
3.  Let boil for 3 to 4 minutes then remove from heat. 
4.  Add peanut butter, vanilla, chocolate extract and oatmeal.
5.  Let mixture cool for 2 to 3 minutes, then drop on waxed paper. You can shape them into round cookies if you choose. 
6.  Dust with powdered sugar and cocoa if desired.  Allow cookies to cool and harden on paper before moving.


Pin It!

Betrothal Brownies


So, I don't want to exaggerate, but I believe that you can't say you really love someone until you've either a: made these brownies for him or her, or b: eaten these brownies prepared by him or her and then immediately proposed marriage.  And I'll not listen to the old "but the love of my life doesn't like chocolate  . . .  "  Seriously?  Then break up before it's too late.  There are few things more miserable than being saddled to a chocolate-hater for life.  Something is fundamentally broken inside.  These brownies are so good I need to warn you against making them for someone you are casually dating.  Don't be a tease, People.  Only make these for someone if you're in it for the long haul.  They.  Are.  That.  Good. 

Even better news: if the baking of these brown beauties does lead to an engagement, I also do wedding photography!  <3 


Don't be tempted to over-bake these if they don't test clean-toothpick done...you could have found a chocolate chip where you tested. They firm up as they cool so resist the temptation to cut into them when they first come out of the oven.

2 cups fine-quality semi-sweet chocolate chips, divided
3½ ounces dark chocolate (90% cocoa), chopped
1½ sticks (¾ cup) unsalted butter
1 cup Florida Crystals sugar
2 teaspoons of prepared instant espresso, room temperature (I put 1 full tablespoon into roughly 3 ounces of hot water, then measured out the 2 teaspoons.  You can dilute it more or less to taste)
2 teaspoons vanilla extract
2 teaspoons chocolate extract
4 large eggs
1 teaspoon salt
1 cup all-purpose flour


1. Preheat oven to 350°. In a metal bowl set over a pan of barely simmering water melt the dark chocolate and one cup of the semi-sweet chocolate chips with the butter, stirring until the mixture is smooth; remove the bowl from the heat, and let the mixture cool until it's lukewarm.
2. Stir in the sugar, espresso, vanilla and chocolate extract; add the eggs, stirring after each addition. Stir in the salt and the flour, until the mixture is just combined. Mix in the remaining chocolate chips.
3. Pour the batter into a well-buttered and floured 9" x 13" baking pan, smooth the top, and bake the mixture in the middle of oven for 25 to 30 minutes, or until a tester comes out with crumbs adhering to it. Let the mixture cool completely in the pan on a rack and cut it into whatever size brownies you like.

Pin It!

Sunday, October 23, 2011

(What the) Halawa (are in these) Treats (?)


One of my favorite places to explore is the Flint Farmer's Market. One of the permanent spaces at the market is occupied by Jawhari's Beirut Restaurant from Linden, Michigan (click here for a review and directions). In addition to cooking up all sorts of great-smelling dishes, they sell a large variety of Middle Eastern specialties. Since going vegetarian (and then vegan) I always make sure to stop at their booth and pick up something I haven't tried before. Yesterday I came home with sugar-free Halawa (a tahini "fudge") and a bottle of pomegranate syrup. I grabbed a fresh pomegranate as well and on the ride home I started to think of what I could do to create something new.

Here's my experiment. I added a few ingredients (like chocolate and pistachios) and came up with a truffle-like treat. It's sweet, but not too sweet, and definitely a new and unique flavor combination for someone like me.

Halawa Treats

4 tablespoons sugar-free halawa
3 tablespoons pomegranate syrup
Fresh pomegranate seeds from 1 wedge of a quartered pomegranate (or ¼ cup dried pomegranate seeds)
½ cup salted pistachios
2 tablespoons natural sugar (plus more for rolling)
1 king-sized bar dark chocolate


1. Combine all ingredients (excluding seeds and chocolate) in a food processor and blend until smooth. Alternately blend with a hand mixer in a bowl.
2. Fold in seeds. Take a tester of the mixture; if it's not sweet enough, add more sugar until it's to your liking. Using a tablespoon measure, portion out mixture into balls and roll in additional sugar.
3. Place balls in freezer for about 10 minutes until they firm up a bit.
4. Melt chocolate in the microwave or in a double-boiler.
5. Roll balls in melted chocolate and allow them to harden on wax paper.
6. If you use fresh seeds your ingredients will be more moist, so you may want to freeze the treats and serve them cold. If you used dried seeds you'll find that they hold up nicely at room temperature. Makes about 1 dozen.

Pin It!

Tuesday, September 20, 2011

Snappy Turtle Cookies (or, Saying "I Love You" with Vegan Cookies Means Never Having to Say You're Sorry for Salmonella Poisoning)


These are my favorite cookies . . . one of Grandma's recipes. I'm not sure what's "snappy" or "turtle-y" about these babies, but they've been called that for over 70 years, so who am I to buck family tradition? I love that these are simple and sweet (but not too sweet). These are more a tea-cake cookie, and are just perfect with a warm cup and good gossip from the gal next door.

The original recipe, from the 1940's, was probably pretty expensive to make during wartime; it called for 3 eggs and butter. As I look through family recipes like this to veganize, I'm always amazed that war brides didn't go ahead and veganize recipes themselves. Grandma had all sorts of ways to replace the dairy during rationing, but usually exchanged eggs with mayonnaise or butter with Oleo (which, by all accounts, sounds disgusting even if it was dairy-free). Too bad most people hadn't thought of flax meal. There were probably some pretty disgusting cookies shipped overseas during WWII!


½ cup Earth Balance
½ cup Florida Crystals brown sugar, packed
2 eggs' worth prepared flax meal (2 tablespoons of flax meal mixed with 6 tablespoons of water. Allow to sit for a few minutes so the mixture thickens)
1½ cups unbleached white flour
¼ teaspoon baking soda
¼ teaspoon salt
1 heaping tablespoon flax seeds (optional)
½ teaspoon vanilla
½ teaspoon maple extract
2 cups chopped pecans (more or less as needed)
½ cup maple syrup (more or less as needed)
3½ ounces dark chocolate (72% cacao), melted


1. Preheat oven to 350º. Cream together Earth Balance and brown sugar. Add prepared flax meal, vanilla and maple flavoring, mixing well.
2. In another bowl, mix flour, soda, salt and flax seeds (if using), then slowly add to Earth Balance mixture until well blended.
3. Portion dough out with a tablespoon and roll into balls. Dip each ball into the maple syrup, then coat ball with pecans. Flatten each ball gently as pictured. Bake for 12 minutes, or until they start to firm up a little and begin to get darker (I bake mine exactly 12 minutes and they are heavenly). After they are cooled completely, drizzle with melted chocolate if desired. Makes about 1½ dozen cookies (or 1 serving for me!).

Pin It!

Sunday, September 18, 2011

Peanut Butter and Jelly Ice Box Cookies


Soooooooooooo, school's back in session. I'm a teacher by trade, and this time of year is still filled with school supplies and new shoes. It's also when my kids and I start dreaming of goodies for our lunch boxes. For my boys, their thoughts turn to peanut butter and jelly sandwiches (their fave for lunch).

In honor of the new school year and the reemergence of lunchtime treats, I thought I'd veganize my grandmother's recipe for her Peanut Butter and Jelly Ice Box Cookies. Fair warning: I am not a baker. I lack skill and patience to make cookies pretty. The pictures reflect this. However, they were moist and lived up to their name. I brought them to school and left them in the teacher's lounge and they only made it to lunch. That's a good sign, considering there are some very discerning palates in the math department at my school.


Peanut Butter and Jelly Ice Box Cookies

¾ cup Earth Balance
1 cup Florida Crystals Sugar
¼ cup Florida Crystals brown sugar
1 cup natural peanut butter
2 eggs' equivalent of prepared golden flax meal (3 tablespons flax meal with 6 tablespoons water. Stir to mix and let stand about 5 minutes until thickened)
¼ teaspoon salt
2 cups unbleached white flour
½ cup spelt flour
¾ teaspoon baking soda (or 1½ teaspoons baking powder if, like me, you are out out out of baking soda but still want cookies!)
1 jar of jelly or preserves (your favorite kind)
Fresh nutmeg and chopped peanuts to garnish


1. Cream together shortening and sugars. Add peanut butter, flax mixture and salt. When well mixed, add flour and baking soda (or powder), blending well.
2. Form mixture into two logs (about the diameter of a paper towel roll) and wrap in wax paper. Put in “ice box” for a few hours or overnight.
3. Preheat oven to 350º. Remove wax paper. Cut rolls into ¼” slices and place cookies on a non-stick cookie sheet. Make an indentation in each cookie. Top each with a teaspoon or so of the jelly. Alternately, roll each slice into a ball and bake in mini-muffin tins. Make indentations with your finger and top with jelly (as pictured). Bake for 8 to 10 minutes (if using muffin tins, bake 10-13 minutes). When they are still hot from the oven, sprinkle with crushed peanuts. Makes about 2 dozen.

Pin It!

Wednesday, July 20, 2011

I’ve Got a Pantry Full of Healthy Junk, and I Want Cookies!


Tahini Cookies.


This recipe literally came from two jars sitting side-by-side in my pantry: tahini and Nutella. Before I made these cookies, I’d never used either one. The tahini was purchased as part of my initial “pantry-stocking” when I became a vegetarian. The Nutella? I had a coupon and it was free. To the left of these jars, on the same shelf, was a bag of muesli. Voilà! A cookie was born!

This cookie doesn’t necessarily require strict adherence to the following recipe. Adding and subtracting a little will change the density of the cookies—a little more tahini and Nutella and the cookies flatten quite a bit; more oats and these puppies stay put. Whatever happens (as long as you don’t burn them) they are too good to share. I’ve made these twice for one of my best girlfriends and she hides them from her family as if she’s Gollum with Precious. She also has a name for these cookies, which I can’t quite post here in its entirety. Suffice it to say these cookies have a nice fiber-y effect.

I double the following recipe. When the cookies are cooled put them in an air-tight container. They’re better the next day.


6 tablespoons tahini
2 tablespoons Nutella (vegan recipe for Nutella available here)
½ cup honey (or agave to veganize)
½ teaspoon ground cinnamon
¼ teaspoon nutmeg
1½ cups quick cooking oats or muesli (increase to 2¼ cups for denser cookies)
¾ cup trail mix of your choice. (I used Whole Foods’ deluxe trail mix from their bulk bins. It has mixed nuts, seeds, dried fruit, oats and chocolate chips)


1. Preheat the oven to 350°. Cover cookie sheets with parchment paper (in my step-by-step picture I only greased the cookie sheets, but the bottoms of that batch burned quickly).
2. In a medium bowl, stir together all the ingredients. Decide how big you want your cookies. You can drop by tablespoon or by a ¼ cup measure. Either way, they should be 2” apart.
3. Bake for no more than 8 minutes in the preheated oven, or until edges are slightly brown. You might want to do a test cookie to determine how long you want to bake them for; the bottoms can burn quickly.
4. Cool on the baking sheet for a few minutes before removing to wire racks to cool completely.

Pin It!

Sunday, July 3, 2011

A Veg 4th of July (or, How I Force-Fed My Dear Friends)

This 4th of July saw a double celebration at our house. In addition to Independence Day, it was also a chance to try out entertaining as a new vegetarian.  I invited some close friends over (far too few for the colossal amount of food I made) and ate ate ate.

I used the party as a chance to make some dishes I’d been thinking about trying. I’m so grateful to my friends for trying everything (loving most all of it) and for giving up a prime meat-grilling holiday to come spend it with their veg pal.

Olive Tapenade
My friend Stephanie was visibly relieved when one of my other guests confessed that he didn’t care for olives.  She then proceeded to hover over the bowl of tapenade until it magically disappeared.
(stolen from Venturesome Vegan Cooking, [page 2] by J.M. Hirsch and Michelle Hirsch)


6 ounces Kalamata olives, pitted
6 ounces Spanish olives, pitted
2 tablespoons drained capers
2 tablespoons extra-virgin olive oil
1 teapoon fresh lemon juice
½ teaspoon lemon zest
1 tablespoon fresh oregano leaves
1 tablespoon fresh thyme leaves
1 teaspoon balsamic vinegar
2 cloves garlic, peeled

(I varied this recipe by adding the lemon zest. I also put all the ingredients together to marinate overnight prior to processing them. The flavors were strong and wonderful)

1. Place all ingredients into a food processor and pulse until a course, thick mixture is formed.
2. Serve immediately or chill for at least an hour.

Fava Bean Dip
I never cooked with dried beans before becoming a vegetarian- who in the hell is organized enough to soak the damn things the day before you use them? I think I still have a bag of split peas from my first apartment (14 years ago). Beans, legumes, grains . . . gotta have them if you want a well-rounded vegetarian diet. So, when I began this veg-conversion a year ago, I started with stocking my pantry. Now my favorite shelf is the one with my assortment of grains and dried beans. A few months ago, I bought a bag of dried fava beans as a goof (because, of course, they have been made famous by Hannibal Lecter. The “fava beans and Chianti” line is oft quoted in my house). Let me just say that dried fava beans are u-g-l-y. They are freakishly large and misshapen. Their color is best described as blah. I had no idea what fava beans tasted like, just knew that my husband would get a laugh or two out of whatever I dreamed up to make out of those babies. Surprisingly, this dip was delicious and perfect on a hot summer day. Obviously, we paired this dip with-wait for it-Chianti.


1 16-ounce packaged of whole, dried fava beans
3 stalks celery, chopped
3 whole carrots, chopped
1 large onion, chopped
1 8-ounce container of Tofutti sour cream
½ tablespoon Berbere' Spice Mix
1 tablespoon lime juice
Chili powder, hot pepper flakes, hot sauce, salt, pepper to taste

1. Soak dried beans overnight.
2. Rinse beans, add fresh water (enough to cover beans by about 2”). Toss in the celery, carrots and onion and bring to boil. Reduce heat and simmer for 30-40 minutes, until beans are cooked through.
3. Drain beans and discard vegetables. After they cool, remove the bean from the outer shell. Squeezing them does the trick. Some beans will be more done than others; don’t worry since you’re going to purée the dip.
4. Put shelled beans into a food processor. Add remaining ingredients and purée to desired taste and consistency. Put in refrigerator and chill for 2 hours or overnight. Serve with flatbread.

Lentil-Mushroom-Walnut Pâté
This was, hands down, my favorite dish of the day. I. could. not. stop. eating. I used the recipe exactly as-is because it is perfection!
(stolen from the Urban Chickpea)

1 cup Lentils de Puy (French green lentils)
3 cups vegetable stock, preferably unsalted
1 teaspoon dried Herbes de Provence
1 bay leaf
1/2 cup walnuts
2 tablespoons of olive oil
1 large onion, thinly sliced
1 garlic clove, minced
1 8-10 ounce package of cremini mushrooms (about 3 cups), thinly sliced
1/4 cup dry sherry (or 2 tablespoons of balsamic vinegar)
2 teaspoons of salt

1. Rinse the lentils until the water runs clear. Add them to a large pot with the vegetable stock and the Herbes de Provence and bay leaf. The stock should be about 2 inches above the lentils; add water if it’s not at that level. Bring up to a boil and then simmer until the lentils are fully cooked, about 45 minutes, adding water as necessary. The lentils will retain their shape, but will no longer be hard or gritty on the inside.

2. In the meantime, preheat the oven to 300 degrees. On a sheet tray, spread out the walnuts and toast them in the oven for about 10 minutes, tossing occasionally. They will be slightly golden and fragrant. Set aside to cool.

3. Heat up a large saute pan and add the oil. Saute the onion over medium-high heat with a pinch of salt until it is soft and golden brown. Then add the minced garlic and saute for 30 seconds. Add the sliced mushrooms with another pinch of salt and saute until they are brown and much of the liquid has evaporated. The whole mixture should be soft and look caramelized. Then add the dry sherry, using it to scrape off any brown bits from the bottom of the pan. Continue to cook until most of the sherry has evaporated. Then remove from heat.

4. In the food processor, pulse the walnuts until finely ground. Then add the cooked lentils (drained from their water and with the bay leaf removed), the mushroom mixture and the 2 teaspoons of salt. Puree until smooth. Taste the mixture and add salt until it tastes perfect. Then add two extra pinches of salt. It will taste too salty warm, but once it cools, it will taste perfect again. The palate perceives salt differently in hot and cold food.

5. Spoon mixture into a loaf pan, mold or tupperware and cover with plastic wrap. Then place a similarly-sized container on top and weigh it down to press the pate. Chill in the refrigerator for several hours. Invert on a plate to serve as an hors d’oeuvre or spread on bread for your sandwich.


Flatbread
(stolen from Venturesome Vegan Cooking,[page 29] by J.M. Hirsch and Michelle Hirsch)


3 cups unbleached white flour (plus some extra for rolling out)
1-1½ cups water, room temperature
1 teaspoon fine sea salt

1. Mix all ingredients together and knead for about 3 minutes. Add more water if needed. Dough should be heavy and a little sticky.
2. Knead the dough on a flat, floured surface for another minute or so. It should be mostly dry to the touch.
3. Roll out the dough and separate it into equal parts (6 for small individual pieces). Dough should be about ¼” thick.
4. You can cook these in a skillet with a little olive oil until they get a little puffy and start to brown up on each side. I brushed both sides with olive oil and threw them on the barbecue grill instead.

Strawberry-Almond Spinach Salad
I think I gave away the recipe with the name!

1 bag of fresh spinach, triple washed
½ carton of strawberries, washed, hulled and sliced
1 handful of sliced almonds
¼ cup balsamic vinegar (I have a fancy-schmancy bottle of strawberry-balsamic vinegar that I used)
1 cup extra-virgin olive oil

1. Put the salad fixings in a pretty bowl and toss gently.
2. Mix the vinegar and oil and serve alongside the salad.

Baked Beans
“Doctoring up” is a valued skill in my family’s kitchen. Baked beans are one of my favorite dishes to futz with because I believe it’s nearly impossible to screw them up. Dump open a few cans into the slow cooker, squirt a little of this, a little of that, and voilà!

2 cans vegetarian baked beans (I prefer drier baked beans, so I drain out about half of the sauce from the prepared beans before I use them)
1 can cannellini beans, rinsed and drained
¼ cup of your favorite spicy brown stone-ground mustard
½ cup catsup
1 large onion, chopped
½ cup molasses
1 tablespoon brown sugar
1 teaspoon garlic powder
1 teaspoon onion powder
Hot sauce (Tabasco, Franks Red Hot, etc) to taste
Salt and pepper to taste

1. Dump all ingredients into a slow cooker and turn the cooker on “high.”
2. Wait. Taste them about 10 times before they’re heated through and bubbling. Put in a little more of this, little more of that until they taste exactly how you like ‘em.


Potato Salad
Like the baked beans, this is another "little of this, little of that" recipe.


3 large russet potatoes, peeled and cut into bite-sized pieces
1 large sweet potato, peeled and cut into bite-sized pieces
1 cup(ish) of Vegenaise
½ cup of your favorite spicy brown stone-ground mustard
1 cup red onion, chopped
3 celery stalks (leaves included), chopped
½ cup red bell pepper, diced
1 tablespoon lemon juice
1 teaspoon garlic powder
1 teaspoon onion powder
½ teaspoon celery salt
½ teaspoon paprika
Hot sauce (Tabasco, Franks Red Hot, etc) to taste
Freshly ground pepper to taste

1. Boil the potatoes until fork-tender (don't overcook).
2. Drain potatoes and combine with remaining ingredients, tasting and adjusting amounts as needed.
3. Refrigerate for at least 2 hours. Sprinkle top with a little more paprika before serving.


Veggie Burgers
This recipe has a lot of ingredients and is a little time-consuming. The good news is that not only are these delicious, they freeze well. So- make a batch and freeze some for later!
(Adapted from Guy Fieri)


2 tablespoons olive oil
6 tablespoons diced red onion
4 tablespoons diced black olives
4 tablespoons diced red bell peppers
2 teaspoons diced jalapeno (or more if you like it extra spicy)
3 tablespoons diced garlic
3 tablespoon diced artichoke (not marinated)
1 15-ounce can black beans, drained
1 15-ounce can chickpeas, drained
1 15-ounce can white beans, drained
1 ½ cups rolled oats
1 teaspoon smoked paprika
1 teaspoon chili powder
2 teaspoon dried oregano
2 tablespoon minced fresh parsley leaves
1 teaspoon red chili flakes
1 teaspoon ground cumin
1 teaspoon celery salt
½ teaspoon ground sage
4 tablespoons Italian bread crumbs
1 teaspoon fine sea salt
3 tablespoons vital wheat gluten (OR 2 eggs)

1. In a medium sauté pan over medium heat, add 1 tablespoon olive oil and all raw vegetables except beans. Sauté until translucent. Remove and cool.
2. Add veggies to beans and mix thoroughly, smashing the beans with your hands. The chickpeas can be pretty difficult to smash, so you may want to pulse them quickly in a food processor until they’re broken up a little. You don’t want to purée the beans because you want some texture to the burgers.
3. Add all dry ingredients along with the gluten (or eggs). Thoroughly mix all ingredients. Use a ½ cup measuring cup and form into 10 patties, cover and refrigerate for at least 30 minutes.
4. In sauté pan add 1 tablespoon olive oil, and cook patties 2 to 3 minutes per side. If you want to toss these on the grill, brush both sides with olive oil and then turn only once.

Gardein Kabobs
I used the recipe from the Gardein site with the following variations. First, I defrosted the beefless tips in the refrigerator before I put them in the marinade. I also marinated the tips overnight. Other changes of mine are noted in the recipe.


2 packages Gardein Beefless Tips
½ cup hoisin sauce
2 tablespoons lime juice
3 teaspoons agave syrup (or honey if you aren’t vegan)
1 clove garlic, minced
1 teaspoon sea salt
1 teaspoon peeled and grated fresh ginger root (I used ginger paste)
1 teaspoon sesame oil
1 teaspoon chili-garlic sauce
Freshly ground black pepper to taste
½ cup toasted sesame seeds (I added these to the actual marinade. Those little suckers held on for dear life, even through the grilling process.)

1. Combine all ingredients together and marinate overnight.
2. When making the skewers, you may want to use the following: pineapple chunks, red onion, green bell pepper, button mushrooms, cherry tomatoes. Make them colorful and pretty!
3. Soak wood skewers in water for about 20 minutes before building kabobs and grilling them. I brushed the veggies with a little olive oil before grilling the kabobs. Heat kabobs until the veggies and tips are heated through, about 3-4 minutes per side. Baste with extra marinade as you grill them if desired. Depending on how you make these, you’ll have enough “meat” for at least 8 kabobs.

Tempeh Riblets
Oh, Tempeh! What’s your deal? To paraphrase, “Some are born to love tempeh, some achieve tempeh-love, and some have tempeh thrust upon them (and aren’t too happy about it).” I have grown to love this wonder food. My kids? Not so much. To their credit, they continue to try everything I make with tempeh, but the texture is not their thing. Oh well- more for me! I recommend doing this recipe a day or so before you want to grill them, since the tempeh requires a little “pre” preparation simmering prior to the marinade.


Simmering the tempeh first:

2 8-ounce packages of tempeh
2 cups low-sodium vegetable broth
2 cups water
¾ cup soy sauce
1 tablespoon minced garlic (I use the pre-minced kind that’s packed in oil)
1 tablespoon each, rosemary, sage and thyme (fresh if you have it)
1 tablespoon dark miso paste (optional)

1. Cut the tempeh in ¼”-thick slices so you make little “riblets.”
2. Combine all ingredients in a large pot and bring to boil; reduce heat and simmer for about 10 minutes, stirring occasionally.

While the tempeh is simmering, prepare the marinade:

¼ cup maple syrup
4 tablespoons olive oil
2 teaspoons cumin
1 teaspoon of cayenne pepper
3-4 teaspoons liquid smoke
4 teaspoons soy sauce
2 teaspoons coarsely-ground black pepper
1 tablespoon minced garlic
1 teaspoon Mrs. Dash Extra Spicy
1 teaspoon Mrs. Dash Steak Grilling Blend

1. Combine all the marinade ingredients in a container large enough for the tempeh and the marinade.
2. Remove the tempeh from the simmering liquid and put right into the marinade while it’s still hot.
3. Marinate overnight.
4. Here’s an optional step prior to slapping these puppies and the grill and slathering them with the bbq sauce of your dreams: I made these about a week before I needed them. After marinating them, I pre-cooked them on my George Forman grill. This got out some of the excess liquid, but also gave me those awesome grill marks. Then I froze ‘em until the party. One less thing to make that day. I defrosted them in the freezer the night before, then we cooked them out on the grill with the sauce until they were all carmelized and smoking hot!

Truffles
These are so dark-chocolaty good it will make your nostrils flare. Keep them refrigerated and sprinkle with cocoa just before serving. They need to be kept chilled while you store them, otherwise they get too soft.
(stolen from Venturesome Vegan Cooking,[page 177] by J.M. Hirsch and Michelle Hirsch)

½ cup maple or agave syrup (or honey)
2 cups almonds, dry roasted
1 12-ounce package of silken tofu
2 cups dark chocolate chips or chunks
Cocoa powder for garnish

1. Put syrup (or honey) in saucepan and bring to boil over medium heat. Add almonds and stir until mixture gets thick and caramel-y (about 12-15 minutes).
2. Spread the almond mixture out on parchment or waxed paper to cool and harden. When it’s hardened, put almonds into the food processor and pummel the heck out of them, until it resembles a coarse flour. Empty out the processor (you’ll need it for the tofu) and set the almonds aside.
3. Meanwhile, put the tofu into a food processor and purée until smooth.
4. Now you need to melt the chocolate chips. You can use the microwave and stir method, or do it on the stove using a double boiler. Once the chocolate is all melted, add to the tofu. Next, add half of the almond mixture and process it again until well-mixed.
5. Spray an 8x8 baking dish with Pam and pour the tofu mixture in. Toss the dish into the freezer for about 30 minutes until firm.
6. Use a melon-baller to scoop out and form into balls. Roll the balls alternately into cocoa powder and remaining almonds. This is messy, messy, messy work, but the end result is well worth it. Because these are so moist, the cocoa powder will absorb right into the truffles if you don’t serve them right away. Just sprinkle them again when you’re ready to eat them. Store them in the refrigerator for up to 2 weeks.

Fruit-Topped Vegan Cheesecake
This recipe freezes really well. I actually prefer a slice straight from the freezer.


3 teaspoons Egg Replacer + 4 tablespoons water (OR 2 eggs)
2 containers Tofutti cream cheese
1 Tofutti sour cream
1 cup turbinado sugar
1 teaspoon vanilla
1 tablespoon fresh lemon juice
1 teaspoon lemon zest (if you like it “lemony”)
3 tablespoons unbleached white flour
4 cups desired fruit
½ cup turbinado sugar
1 prepared pie crust (here’s a recipe for vegan graham crackers from Vegan Yum Yum)

1. Mix all cake ingredients with a hand mixer or food processor until smooth.
2. Pour cake mixture into crust and bake at 350° for an hour or until cake is set and the center bounces back when you touch it.
3. While cake is baking, prepare fruit topping. In a saucepan over medium-high heat, add fruit and sugar and stir to mix. Heat until mixture gets syrupy and fruit begins to break down. The mixture will thicken a bit the longer you cook it, but you can add 1 teaspoon of cornstarch mixed in ¼ of water to thicken the fruit topping even more.
4. When fruit topping is to desired thickness, remove from heat and allow it to cool.
5. When cake is finished baking, cool it on the counter then refrigerate for at least 2 hours along with the fruit topping. Your cheesecake will not be bright white because natural sugar has a caramel color to it. When ready to serve, cover the cake with the fruit or just top individual slices.

Pin It!

Vegetarian since:

© 2011 Vegerrific

All content and photography by Krevia™ Media, 2011. No portion of this website may be duplicated, copied, published or rewritten without prior consent. All Rights Reserved.


Twitter Delicious Facebook Digg Stumbleupon Favorites More

 
Creative Commons License
Vegerrific by Kreiva™ Media is licensed under a Creative Commons Attribution-NoDerivs 3.0 Unported License.