#navbar-iframe { height:0px; visibility:hidden; display:none; }
Showing posts with label pasta. Show all posts

Saturday, October 1, 2011

Stuffed Eggplant Appetizers


My amazing cousins Jean and Jerry had the best baby shower I ever attended for many reasons, not the least of which was the food. It was catered and there were all sorts of good things to nibble on as we celebrated Molly's impending arrival.

One dish that I especially loved was a stuffed eggplant appetizer. They were presented beautifully and had all sorts of interesting flavors and textures. I've thought about making them myself over the years but never have. Problem with me is that I love eggplant too much, and breaded eggplant is the cat's pajamas. It's hard for me to be patient and do something more to it when it already looks so good.

Having this blog has motivated me to pull out all those clippings and handwritten recipes that I've kept close for years. Even though many have meat as a main component I still like having them close to me, like old friends. I dug into a box last night and pulled this idea out. The note read: Eggplant appetizer from Jean's shower. Pasta, cheese, pine nuts, and some other stuff.

I knew what I meant by that note, but since you might not I've written out the recipe I made up below. :0)

Stuffed Eggplant Appetizers

3 small eggplants, peeled and sliced lengthwise into thin pieces (mine were too thick. If you have a mandolin use that)
1 tablespoon olive oil plus more for frying
Uncooked spaghetti (enough to fit your index finger and thumb
around)
½ cup flour
1 cup Italian-seasoned bread crumbs
½ cup corn meal
2 tablespoons nutritional yeast flakes or ½ cup vegan Parmesan cheese, grated
¼ teaspoon garlic powder
¼ teaspoon onion powder
¼ teaspoon paprika
¼ teaspoon freshly ground pepper
2 eggs' equivalent of Egg Replacer (or more as needed)
½ cup prepared pesto (or Italian seasoning that comes in a tube)
½ cup vegan mozzarella cheese, shredded
½ cup toasted pine nuts, whole or chopped fine


1. Break spaghetti up into quarters or thirds and cook according to package directions. Drain well. In a bowl, toss cooked spaghetti with a little olive oil to keep it from getting sticky and set aside.
2. Cut each slice of eggplant into strips, making rectangles of equal size. A pizza cutter works wonders at this as it doesn’t tear the eggplant. Save the eggplant “scraps” and use them in your morning tofu scramble!
3. Put the flour in a shallow bowl. In a separate bowl, combine bread crumbs, corn meal, grated vegan Parmesan or nutritional yeast, garlic powder, onion powder, paprika and pepper. Stir to mix well. In one more bowl, prepare Egg Replacer.
4. Coat eggplant rectangles very lightly in flour; shake off excess. Dip pieces in Egg Replacer then dredge in bread crumb mixture to coat. Let breaded eggplant rest for about 10 minutes.
5. Heat a few tablespoons of oil in a non-stick skillet over medium heat. Fry breaded eggplant until golden on both sides. Drain very well on paper towels. Let eggplant cool to room temperature. While cooling, preheat your oven to 350°.
6. When cooled, spread some pesto on the strip then place about 1 tablespoon of spaghetti mixture at the bottom of each rectangle.
7. Sprinkle some pine nuts and vegan Mozzarella on top of spaghetti.
8. Roll rectangles up from bottom and place on a non-stick cookie sheet, seam end on bottom. Use toothpick to keep them closed, or put them on skewers as I did. Trim off any spaghetti that hangs over the sides with kitchen shears.
9. Bake until heated through, about 8 minutes. Cut each roll in half, if desired, for bite-size pieces. Serve hot or at room temperature.

Pin It!

Wednesday, September 21, 2011

Creamy Coconut-Curry Sauce


There aren't many restaurants in my neck of the woods where one can get a satisfying vegan meal (you know, one with actual protein in it). Sometimes when I go out with friends, I'm reduced to eating french fries (which doesn't do me any favors). My regular lunch date, Kate, has been extremely patient with me as I've begun to eat a vegan diet. I'm like Sally from "When Harry Met Sally," with everything prepared specially or "on the side." The other day, we ate at a chain restaurant called "Stir Crazy." It was a great meal, due in large part to a patient server and a very vegan-friendly menu. I had the coconut-curry vegetable dish and became obsessed with recreating it at home. Kate, who had also tried it, said she was going to stop taking my calls until I figured it out; I kept calling to ask if she tasted this or that in the sauce.

I've never cooked with curry in my life. In fact, before I tried this my jar of curry had never been cracked open (I bought it over a year and a half ago). I am so pleased with the results, though, because this tasted better than the inspiration in my opinion.

Creamy Coconut-Curry with Dry Fried Tofu

1 can light coconut milk
1 tablespoon corn starch
1 tablespoon spicy curry powder (or more to taste)
1 tablespoon minced garlic
½ tablespoon fresh, minced ginger
½ tablespoon minced hot peppers (or more to taste)
1 tablespoon good-quality ketchup
1 teaspoon onion powder
1 teaspoon tumeric
½ teaspoon sea salt
Freshly-ground black pepper
Stir-fry fixings (I used dry-fried tofu*, red bell pepper, mushrooms, onions, broccoli, coarsley-chopped peanuts, garlic and ginger)
Prepared vegan Japanese noodles (I used soba; I wanted to use udon like the dish I tried to recreate did, but the ones I purchased had egg whites in them. The soba noodles were good, but next time I'm making homemade udon noodles with this recipe!)


1. Pour half of coconut milk into a cup and stir in cornstarch; stir briskly until smooth and set aside.
2. Pour the rest of the coconut milk and all remaining ingredients into a pot over medium heat. Whisk constantly to keep milk from scorching.
3. When it begins to bubble, add milk-cornstarch mixture and whisk well. Stir sauce until it's hot, bubbly and creamy.
4. Prepare stir-fry fixings and noodles. Add well-drained noodles to stir-fry. Add curry sauce and toss everything to coat well. Top with some more minced hot peppers if desired.

*To dry-fry tofu: cut well-pressed, extra-firm tofu into cubes. In a DRY, hot skillet, brown the tofu on both sides, gently pressing out any remaining water as you do so.

Pin It!

Saturday, August 13, 2011

Say "Gnocchi" Three Times Fast


Gnocchi with Mushroom Sauce.


I have dear friends who can make gnocchi like it's nothing (Mukul, Kate, and Lisa- I'm talking to you!). Gnocchi is something I love to eat but the process to make it always intimidated me. When I outted myself as a new vegetarian, people from all over began sending me links to recipes. This one was sent to me from my friend, Lisa, who found it on the Kitchen Boss site.

What follows is the recipe from the site along with my pictures as I attempted to cook out of my comfort zone. I made minor changes to make the recipe vegetarian, and also made suggestions to make it vegan. This is the first time I ever made gnocchi, as you will notice by my lame, mishappen little potato dumplings. They look goofy, but they were great.


Gnocchi:

3 large Russet potatoes
2 large egg yolks, beaten
1-2 cups unbleached white flour (may not use all)
½ teaspoon fine sea salt
Few gratings nutmeg (optional)
(You can omit the eggs to make gnocchi vegan. Here is an excellent recipe for gnocchi from Tyler Florence. Replace his egg white with the equivalent amount of Egg Replacer and you have vegan gnocchi!)


Gnocchi:

1. Preheat oven to 400°. Prick potatoes and bake until done, 45 minutes to one hour. Remove from oven, and slash lengthwise through each potato, pressing short ends to open to release steam (you want the potatoes as dry as possible = less gummy gnocchi). When cooled enough to handle but still quite warm, scoop out the potato flesh and force through a ricer. Measure out 3 lightly scooped cups (do not pack) and spread out into a rectangle on a clean board or counter. Allow potatoes to cool until warm room temperature.

2. Sprinkle with salt and grate over nutmeg. Drizzle the egg over potatoes, followed by 1/2 cup of flour. With a (metal) bench scraper, begin to lift and fold the potato mixture on to itself, cutting the flour and egg into the potato mixture. When almost incorporated (mixture will begin crumbling), sprinkle over another 1/4 cup flour , and repeat until mixture is in small crumbs. Lightly press the dough together into a ball and move it aside. Clean any sticky dough from counter with the scraper and cover with a light dusting of flour.

3. On the floured surface, lightly press the dough together and fold/knead just a few turns -- dough should be workable with some potato texture and not sticky. Adjust by adding more flour if necessary -- the less flour and handling needed, the more tender the resulting gnocchi.

4. Cut the dough into quarters. On a lightly floured board, roll one portion of dough into a long rope, about 1/2" wide. With the bench scraper, cut 1" pieces of dough from rope and place on a floured sheet pan -- these are your gnocchi.

5. Cook gnocchi at a gentle boil in a large pot of abundant salted water. Gnocchi are done when they bob to the surface and cook about a minute longer. Scoop from water and place in sauce.


Mushroom Sauce:

1¼ pound cremini mushrooms, wiped and trimmed
.07 ounce package dried porcini mushrooms (or equivalent weight loose)
2 cups Imagine No-Chicken broth
¼ cup dry white Italian wine
2 plump cloves garlic, minced
½ teaspoon red pepper flakes
½ cup coarsely chopped Italian parsley
3 tablespoons extra virgin olive oil
2-3 tablespoons Earth's Balance No-Soy spread
1 tablespoon white truffle oil (this is very strong- you may want to half this amount if you haven't had truffle oil before)
Fresh grated Parmesan to garnish (optional)
Salt
Fresh black pepper


1. Warm the No-Chicken broth and pour over the porcini mushrooms in a bowl. Allow mushrooms to soak at least 20 minutes to hydrate. When hydrated, remove the mushrooms, rinse and trim away any tough gritty bits if present. Coarsely chop the mushrooms and set aside. Filter the mushroom soaking liquid through cheesecloth, a paper or tea towel and reserve.

2. Slice the creminis. Heat a large sauté pan medium-high – you want it large enough to eventually hold both the sauce and cooked gnocchi. Add the olive oil. When shimmering, add the mushrooms and a good pinch of salt. Cook, stirring, and allow the mushrooms to exude their juices. Let the juices cook and reduce down until almost completely evaporated. Add the porcini, garlic and red pepper. Continue to cook until well combined, everything smelling fragrant and beginning to dry out.

3. Add the wine and let reduce. Add ½ cup of the mushroom-soaked stock and let reduce until rich, add in another ½ cup stock, reducing again. Stir in the parsley. Taste and check for salt; correct if necessary. Turn off heat if the gnocchi has not yet finished cooking.

4. Meanwhile, begin cooking the gnocchi. Gently scoop the gnocchi as it’s done into the waiting mushroom sauce. Turn the heat to med-high and add another ½ cup of the stock, turning gnocchi to coat. If the gnocchi looks like it can absorb more stock, add in a little more -- you don’t want it to become too soft. Fold in the Earth's Balance and truffle oil. Garnish with grated or shaved Parmesan cheese if desired.


Pin It!

Tuesday, July 12, 2011

Looking for a 12-Step Program for Cheese Addiction

According to the book Breaking the Food Seduction: The Hidden Reasons Behind Food Cravings by Neal D. Barnard and Joanne Stepaniak, researchers discovered that cow’s milk has traces of morphine. Cow’s milk also has a protein called casein. Casein breaks apart during digestion and releases a whole goody bag of opiates. Casein is in milk, and it is especially concentrated in cheese (51). So, essentially, I guess that makes me a cheese-tweaker.

Now, the first Step in “The 12 Steps” states that I must admit I am powerless over my addiction – and that my life has become unmanageable. Hmmmm. So, sometimes I do feel powerless in front of the cheese case at the Flint Farmer’s Market, but I can’t exactly say my love of Havarti has made my life fall apart. I can quit any time I want to. Seriously. I’m just a social fondue-dipper.

When I became vegetarian I found that there are many levels. Flexitarians eat meat in moderation. Pescatarians eat fish. Lacto-ovo vegetarians, like me, don’t eat any animal flesh but eat eggs and dairy. Vegans take it further still, and don’t eat any animal products, including things like honey, gelatin, and (damnit!) cheese.

Early into this process I gave up drinking cow’s milk or using it in my cooking. I developed a taste almost immediately for unsweetened almond milk (which has fewer calories than skim milk and more calcium than whole milk). I still occasionally eat eggs, but mostly out of laziness- I really don’t enjoy cooking breakfast and a quick egg sandwich is a nifty shot of protein. Even so, if I was told tomorrow that I couldn’t have another egg ever, I’d be fine with that. But cheese? Cheese, glorious cheese? I don’t know about that. After about five minutes of searching vegan/vegetarian blogs you’ll find that the one thing standing in the way of thousands of vegetarians becoming straight-up vegans is that crazy morphine-infused monkey, cheese.

There are cheeses which are vegetarian-friendly, in that the rennet used to create them is not animal-derived (see this list for vegetarian cheeses). Most rennet is derived from the stomach tissue of a slaughtered calf, but there is vegetable rennet as well, and the cheeses on the list use that (or no rennet at all). But these vegetarian-friendly cheeses use cow or goat milk, so for vegans, they are still off-limits.

There are whole industries built around producing the perfect non-dairy vegan cheese. If you scroll down the message boards of any vegan blog you’ll see a lot of posts very much like this one:

“Hi there. I’m a new vegetarian who would like to become vegan but I don’t think I can give up cheese. Are there any vegan cheeses that actually taste like real cheese?”

And following it, you’ll invariably see a response which simply reads:

“No.”

Some brands, like Daiya, are pretty close, but Daiya is no more like Swiss Gruyere than aspirin is like morphine. Even so, I have been trying to develop a taste for vegan “cheeses” and hope to one day kick my habit. I have kids, people. I don’t want to be a full-blown casein junkie.

This quest led me to today’s recipe. One alternative I found was to make cheese out of nuts. It is a little time-consuming, but once you get the method figured out it’s easy to make soft cheeses that fill the void in your heart left by sharp Cheddar. It isn’t the same, but nut cheese is delicious and really appeals to my creative side. Switching around the nuts used and the added ingredients produces all sorts of interesting flavors and textures. Have I given up cheese completely? Not quite. But if I get better at making my own vegan versions, I just might.

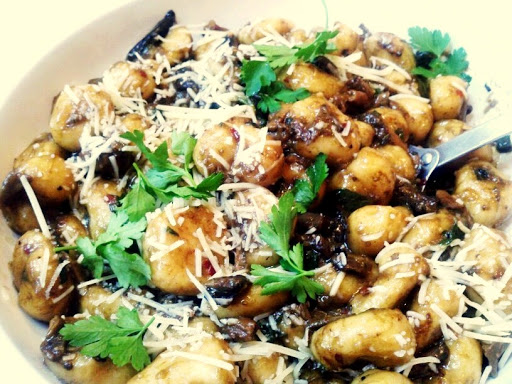
Garlic Ravioli with Cashew Cheese


First things first: make the cheese about two days before.

Cashew Cheese

(Stolen from The Conscious Cook by Tal Ronnen, page 121. I made a few minor adaptations)


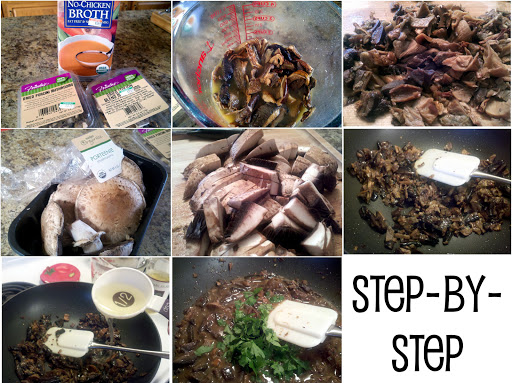
The acidophilus capsules I used

2 cups whole raw cashews (no cashew pieces because they are too dry and not creamy enough. They have to be RAW, otherwise they'll get rancid and you'll get sick and die. Or they'll just taste awful. Why risk either of those things?)

8 capsules Solgar Advanced 40+ Acidolphilus (you just want the powder from the capsules). Tal Ronnen uses New Chapter All-Flora Probiotic (powder from 6 capsules), but I couldn't find it. Whatever you get, check to make sure the brand is vegetarian. Generally gelatin capsules are NOT.

1 tablespoon nutritional yeast flakes
1 teaspoon fine sea salt
½ tablespoon onion powder (or more to taste. He uses a full tablespoon but I found that a little over-powering)
½ teaspoon white pepper
Dash of nutmeg, grated
4 tablespoons fresh herbs (I used fresh garlic scapes- the green tops) Tal uses tarragon and chives

1. Cover the cashews with cold, purified water in a non-reactive bowl and let it sit overnight (at least 12 hours).
2. The next day, mix together the probiotic powder in 2 tablespoons of the soaking water.
3. Drain the cashew nuts and put them in a blender or food processor with the probiotic powder mixture. Blend until smooth and creamy (it takes some patience. Keep scraping the sides with a rubber spatula).
4. Cover the bottom of a fine mesh colander with three layers of rinsed (and wrung dry) cheesecloth. Put the cashew nut mixture into the cheesecloth. Fold the layers of cheesecloth to cover the top of the vegan cheese and twist to tightly close the top.
5. Place the colander over a bowl. Put something heavy on top of the wrapped cheese to help press it as it ferments. Let the cashew cheese stand in a warm area for about 14 hours. Liquid whey will collect in the bottom of the bowl. Don't throw it out; you can use it when you make the pasta!
6. After 14 to 16 hours your cheese will smell yeasty and have a soft dairy cheese-like quality to it. Remove the cloth and put cheese into a food processor. Mix in all the other ingredients except the herbs.
7. Shape the cheese on a piece of parchment paper and put it in the fridge until firm (a few hours, or best is overnight)
8. When firmed up a bit, roll cheese in the herbs (or garlic scapes in my case).
9. Cut the cheese (couldn't resist)!

NOTE: If you are a sissy and are afraid to ferment the cheese (or too lazy to wait), just soak the nuts overnight then proceed right to the mix-in stage. You'll want to let it firm up in the fridge for a few hours and it will taste ok, I guess, but fermentation is what makes cheese, well, cheesy. Try it, you'll like it!

Ravioli (Look, Ma, no eggs!)
(I followed the recipe by Bob's Red Mill, which is a traditional semolina pasta recipe.)


1. I followed the pasta recipe, but I substituted the whey produced from my cheese-making for the water. If you don't have enough whey to adequately make the dough, just add more water.

2. I cheated, and dumped the dough ingredients in my bread maker to knead it. I rolled the dough out with my pasta maker. I started at the largest setting, then kept rolling it until it was at the thinnest setting. I also sprinkled minced garlic scapes into the dough before I built the raviolis.

3. I put a tablespoon of the cashew cheese into each ravioli, sealed it with water, then crimped the sides with a fork.

4. I cooked them in boiling, salted water for about 3 minutes, until they floated on top. When done, I gently tossed them in melted Earth's Balance (a vegan buttery-type spread that we actually prefer to butter) and sprinkled them with some grated nutmeg and more garlic scapes. Then I brushed my teeth because Mama had garlic breath something fierce. But it was totally worth it!

In closing: making nut cheese was so easy, I ended up making two more batches (one with walnuts, one with almonds). They were all delicioso and only lasted about three days. In a less gluttonous household, nut cheeses last at least a week or two in the refrigerator. Here are some serving suggestions:

1. Thin it with a little soy creamer (or almond milk if you made almond cheese) and use it as a sauce over pasta
2. Spread it in a sandwich or wrap
3. Cut in thick rounds and make bruscetta
4. Using a tablespoon, eat it straight out of the wrapping (you need to be in your underwear, standing in front of the refrigerator at 1 am to do this properly). Go nuts!

Pin It!

Vegetarian since:

© 2011 Vegerrific

All content and photography by Krevia™ Media, 2011. No portion of this website may be duplicated, copied, published or rewritten without prior consent. All Rights Reserved.


Twitter Delicious Facebook Digg Stumbleupon Favorites More

 
Creative Commons License
Vegerrific by Kreiva™ Media is licensed under a Creative Commons Attribution-NoDerivs 3.0 Unported License.